Every product is independently reviewed and selected by our editors. If you buy something through our links, we may earn an affiliate commission at no extra cost to you.
It’s not just a recipe; it’s a near-scientific process that breaks down into three time-blocked stages, each contributing to the ultimate rib experience.
If you’re new to smoking ribs, you might wonder what makes this method stand out. It’s all about time and temperature control, allowing the meat to absorb smoky flavors, soften, and finally, caramelize to a mouthwatering finish.
By following this method, even beginners can serve up ribs that taste like they come from a professional smokehouse.
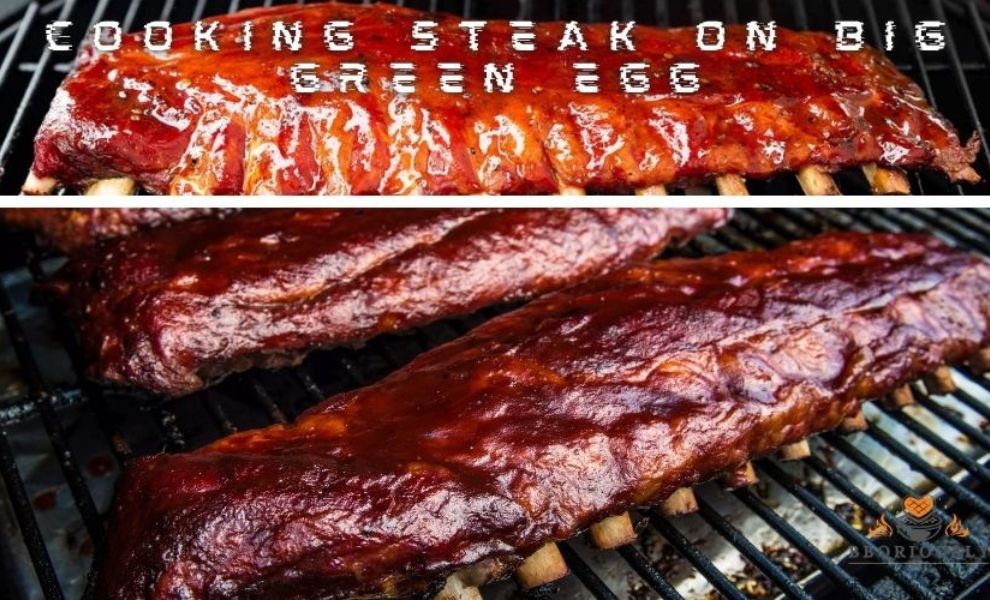
3 2 1 Ribs Method: A Step-by-Step BBQ Guide
Master perfectly tender, flavorful ribs with the 3 2 1 Ribs Method. This step-by-step BBQ guide makes slow-cooked perfection simple and delicious.
What Are 3 2 1 Ribs?
3 2 1 Ribs are a style of cooking pork ribs using a specific time-based technique. The ribs are smoked for three hours, wrapped and cooked for two more, then finished unwrapped for the final hour. This process is designed to give ribs that perfect balance of smoke, tenderness, and a caramelized exterior.
Why Choose The 3 2 1 Method?
- Consistent results: Follow this approach for perfectly cooked ribs every time.
- Easy to remember: The method’s name itself is the recipe, making it simple to recall.
- Customizable: While the timings are set, flavors and sauces can be tailored to your taste.
Breaking Down The 3 2 1 Method
- Smoke Phase (3 hours): Ribs smoke directly on the grill, absorbing rich flavors.
- Wrap Phase (2 hours): Ribs are wrapped in foil to tenderize with their juices.
- Finish Phase (1 hour): Ribs return to the grill for a final touch of smoke and sauce.
Best Smoker for ribs


Each phase in the 3 2 1 Ribs Method plays a crucial role in creating the ultimate rib experience. The slow and low cooking process is key to infusing the meat with deep, smoky nuances while keeping it succulent. Ready to transform your rib game? Keep reading to master the stages of the 3 2 1 Ribs Method.
The Basics Of The Method
This method simplifies the cooking process, breaking it down into three timed segments. You’ll spend three hours smoking the ribs, two hours cooking them wrapped in foil, and a final hour unwrapped to finish. It’s a foolproof formula that balances smoke, moisture, and heat to create ribs that are sure to impress.
Let’s dive into the basics of this method and get those ribs sizzling!
Key Steps
The 3 2 1 Ribs Method is as easy as counting to six. Each number represents the hours you dedicate to a stage of cooking. Here’s how it goes down:
- Smoke: Place ribs bone-side down in the smoker and cook for 3 hours at 225°F (107°C). The slow heat infuses smoky flavor deep into the meat.
- Wrap: Next, wrap the ribs in foil with a splash of liquid to steam them. Cook for 2 more hours. This makes them tender.
- Finish: Remove the foil and cook for another hour. The ribs get a nice crust outside but stay juicy inside.
It’s all about time and temperature. Keep a close eye on both to make sure your ribs are cooking just right. Here’s a quick table to help you track the process:
| Stage | Time | Temperature | Notes |
| Smoke | 3 hours | 225°F (107°C) | Bone-side down, no wrap |
| Wrap | 2 hours | 225°F (107°C) | Foil wrap with liquid |
| Finish | 1 hour | 225°F (107°C) | No foil, sauce optional |
Essential Equipment
Even the best chef needs the right tools. For the 3 2 1 Ribs Method, you’ll need some specific equipment:
- A Smoker: This is where the magic happens. Choose one that can maintain a steady temperature of 225°F (107°C).
- Wood Chips or Chunks: These give your ribs that smoky taste. Hickory, apple, or cherry woods are great choices.
- Aluminum Foil: You’ll wrap the ribs in foil during the second stage to lock in moisture.
- Meat Thermometer: This ensures your ribs are cooked safely and perfectly.
- Basting Brush: Use this to apply your favorite sauce during the last hour of cooking.


Make sure you have everything ready before you start. You don’t want to run looking for foil with your ribs waiting. Here’s a checklist to keep you organized:
| Equipment | Use |
| Smoker | Main cooking |
| Wood Chips/Chunks | Flavor |
| Aluminum Foil | Wrapping ribs |
| Meat Thermometer | Check doneness |
| Basting Brush | Apply sauce |
Gather these essentials and you’re all set. With the right tools, the 3 2 1 Ribs Method is a breeze!
Selecting The Right Ribs
The 3 2 1 Ribs Method is a popular way to cook ribs. It makes them tender and tasty. The key to success starts with selecting the right ribs. This choice can make a big difference in your cooking. Let’s dive into how to pick the best ribs for this method.
Types Of Ribs
There are several types of ribs to choose from. Each has its own size, flavor, and cooking time. Knowing these differences helps you pick the right one for your meal.
- Baby Back Ribs: These are smaller and leaner. They cook faster than other types.
- Spare Ribs: These are larger and have more fat. They are very flavorful.
- St. Louis Style Ribs: These are trimmed spare ribs. They have a uniform shape which makes them easier to cook evenly.
Consider these types when choosing. Think about the size of your grill or smoker and how many people you are feeding.
Quality Considerations
Quality is key when selecting ribs. Good quality ribs result in better flavor and texture. Here are some tips to find the best ribs:
- Look for meaty ribs. More meat means more to enjoy.
- Find ribs with even fat distribution. Fat adds flavor and helps keep the ribs moist during cooking.
- Avoid ribs with a lot of surface fat. Too much fat on the surface can prevent seasonings from penetrating the meat.
- Check the color. Fresh ribs should have a pinkish-red color. Avoid ribs that look gray.
Also, ask your butcher for advice. They can help you find ribs that are just right for the 3 2 1 method. Remember, the quality of the ribs can make or break your barbecue.
Seasoning And Marinades
The first step sets the stage for flavor, and that’s where seasoning and marinades come into play. They are the heart of any great barbecue rib recipe. A good seasoning can transform your ribs from good to great, infusing them with layers of flavor that complement the smoky notes.
Dry Rubs
When it comes to ribs, the dry rub is your foundation for flavor. A dry rub is a blend of spices and herbs that you rub onto the meat before it hits the smoker. This creates a crusty ‘bark’ that’s packed with taste. Here’s how to get it right:
- Start with a base of salt and sugar for balance.
- Add paprika for smokiness and color.
- Throw in garlic and onion powders for a savory punch.
- Consider a touch of cayenne or chili powder for heat.
- Mix in dried herbs like thyme or oregano for complexity.
Every rack of ribs deserves a personal touch. Feel free to experiment with your spice cabinet to create a signature rub. Apply your dry rub generously, covering all sides of the ribs, and let them sit for at least an hour. This allows the flavors to penetrate the meat.
Wet Marinades
A wet marinade does more than add flavor. It also tenderizes the ribs, thanks to the acids in ingredients like vinegar or citrus. Here’s a basic formula for a marinade that will keep your ribs juicy and flavorful:
- Begin with a liquid base such as apple cider vinegar, beer, or pineapple juice.
- Add a sweet element like honey or brown sugar to balance the tanginess.
- Incorporate soy sauce or Worcestershire for depth.
- Don’t forget garlic and onions for their aromatic qualities.
- Finish with a splash of hot sauce or a pinch of red pepper flakes for a kick.
Submerge your ribs in the marinade and let them soak up the goodness for several hours, or even overnight in the fridge. The longer they marinate, the more flavorful and tender they will become. Just make sure to pat them dry before applying the dry rub or placing them in the smoker, to ensure the perfect texture on the bark.
Smoking Process
This method ensures that the flavors penetrate deeply while maintaining perfect tenderness. The key to success lies in two crucial steps: selecting the right wood and managing the temperature. Let’s dive into these aspects to ensure your ribs are nothing short of spectacular.
Choosing Wood Types
Every wood type adds its unique flavor to ribs. The choice can make or break the taste you’re aiming for. Here’s a guide to help you select the perfect wood:
- Hickory: Imparts a classic, strong bacon-like taste. Great for a robust flavor profile.
- Apple: Offers a sweet, fruity note. Ideal for a subtle yet distinct touch.
- Mesquite: Packs a punch with a bold, earthy aroma. Use sparingly to avoid overpowering.
- Cherry: Blends well with other woods. It provides a mild, sweet flavor.
- Oak: A versatile choice. Gives a medium smoke intensity that’s not too overpowering.
Consider mixing woods to create a custom flavor profile. A popular combination is hickory and apple, balancing strong and sweet notes. Ensure the wood is free of chemicals and properly dried. Wood chips or chunks work best for smoking ribs. Use the table below to match wood types with desired flavors:
| Wood Type | Flavor Profile | Best Used For |
| Hickory | Strong | Hearty Flavors |
| Apple | Sweet, Fruity | Subtle Sweetness |
| Mesquite | Bold, Earthy | Intense Flavors |
| Cherry | Mild, Sweet | Mixing Woods |
| Oak | Medium Smoke | General Smoking |
Temperature Control
Temperature plays a pivotal role in smoking ribs. It’s essential to maintain the right heat level throughout the cooking process. Aim for a steady 225-250°F (107-121°C) range. This low and slow approach allows the meat to cook thoroughly without drying out.
Use a reliable meat thermometer to track the internal temperature of your ribs. Keep the smoker’s lid closed as much as possible to maintain a consistent temperature. Here are some tips to help manage the heat:
- Preheat the smoker to the target temperature before adding the ribs.
- Use a water pan to stabilize the smoker’s environment. It adds moisture and regulates heat.
- Adjust the vents. Open vents mean higher temperatures, while closed vents reduce it.
- Check the temperature every hour. Make slight adjustments as needed.
- Be patient. Avoid frequent lid openings which can cause temperature spikes.
This practice helps refine your technique for the next smoking session. With patience and attention to detail, you’ll achieve that perfect rib texture every time.
Wrapping For Tenderness
The 3 2 1 Ribs Method is a popular way to cook ribs. This method makes the ribs very tender. Part of this method involves wrapping the ribs in aluminum foil.
Wrapping helps keep the ribs moist and tender. Let’s dive into how to wrap ribs right and manage cooking times for the best results.
Aluminum Foil Techniques
Wrapping ribs in aluminum foil is a key step for tenderness. The foil traps steam and heat, cooking the ribs gently. Here’s how to do it right:
- Choose the right foil: Use heavy-duty aluminum foil. It’s strong and holds heat well.
- Wrap tightly: After adding your choice of liquid (like apple juice), wrap the ribs tightly. This keeps the steam inside.
Here’s a simple table to remember:
| Step | Detail |
| Pick Foil | Use heavy-duty foil |
| Add Liquid | A bit of apple juice or water |
| Wrap | Wrap ribs tightly |
These techniques help the ribs stay juicy and tender.
Timing Tips
Timing is everything in the 3 2 1 Ribs Method. Here’s how to nail it:
- First 3 hours: Cook ribs uncovered, with smoke.
- Next 2 hours: This is when you wrap the ribs in foil. Keep them on the grill or in the smoker.
- Last hour: Remove the foil. Finish cooking the ribs with sauce, if you like.
Remember these key times:
| Phase | Time |
| Smoke | 3 hours |
| Wrap | 2 hours |
| Sauce | 1 hour |
Following these timing tips ensures your ribs come out tender every time. Patience leads to perfect ribs.
Finishing Touches
These final steps are where flavors meld and the magic happens. Your ribs have been smoked, wrapped, and now they’re ready for the grand finale.
Here, we focus on the art of saucing and caramelization. These are the techniques that give your ribs a tantalizing glaze and a mouthwatering crust.
Saucing Techniques
A perfect sauce application can make your ribs irresistible. It’s all about timing and technique. Begin by heating your sauce slightly — this helps it spread evenly. About 30 minutes before your ribs are done, start applying the sauce.
Use a brush to gently coat the ribs, adding layers every few minutes. This builds up a rich, sticky coating that’s packed with flavor. Here’s how to sauce like a pro:
- Layer It On: Apply the sauce in thin, even layers, allowing each to set before adding the next.
- Low and Slow: Keep the heat low to avoid burning the sauce. This lets the flavors develop without charring.
- Final Glaze: Right before serving, add one last layer of sauce for that glossy finish.
Remember, not all sauces are created equal. Some are sweet, some are spicy, and others have a tangy kick. Choose a sauce that complements the rub you’ve used. Here’s a simple table to match sauces with common rib rub flavors:
| Rub Flavor | Sauce Pairing |
| Spicy | Sweet BBQ Sauce |
| Sweet | Spicy Mustard Sauce |
| Herbal | Tangy Vinegar Sauce |
Caramelization Tips
Caramelization is the crowning glory of the 3 2 1 ribs. It’s what gives your ribs that crave-worthy crust. This happens when the sugars in the sauce and rub combine with the meat’s natural juices under heat, creating a beautiful mahogany bark. To achieve this:
- Watch the Heat: Keep your grill or smoker at a medium temperature. Too hot and you’ll burn the sugars; too cool and you won’t get that caramelization.
- Patience Pays Off: Let the ribs cook undisturbed during the final stage to allow the crust to form.
- Finish on Open Flame: If possible, give the ribs a quick sear over an open flame for a few seconds. This can intensify the caramelized crust.
The key to perfect caramelization lies in balance. You want a crust that’s crisp but not burnt, with a sweet and savory depth that complements the tender meat. Keep a close eye on your ribs during the last few minutes of cooking.
A slight char adds character, but there’s a fine line between caramelized and carbonized. Trust your instincts, and when those ribs look like a masterpiece, it’s time to pull them off the heat.
Serving Suggestions
A great dish is more than just taste; it’s about the full experience. The right side dishes and presentation can turn your ribs from a simple meal to an unforgettable feast.
Let’s dive into some serving suggestions that will complement your perfectly cooked ribs.
Side Dish Ideas
Choosing the right side dishes can elevate your rib feast. You want flavors and textures that complement, but don’t overpower, the star of the show. Here are some classic pairings:
- Coleslaw: A creamy, tangy slaw cuts through the richness of the ribs.
- Cornbread: Sweet, buttery cornbread offers a comforting balance.
- Baked Beans: Smoky, hearty beans work well with the meat’s flavors.
- Grilled Corn: Charred corn on the cob brings a smoky sweetness.
- Mac and Cheese: Creamy and rich, it’s a crowd-pleaser.
- Green Salad: A light salad can cleanse the palate between bites.
For a more organized display, consider this table of sides:
| Side Dish | Flavor Profile | Texture |
| Coleslaw | Tangy and Creamy | Crisp |
| Cornbread | Sweet and Buttery | Soft and Crumbly |
| Baked Beans | Smoky and Hearty | Thick and Savory |
| Grilled Corn | Sweet and Smoky | Juicy and Crunchy |
| Mac and Cheese | Creamy and Cheesy | Soft and Gooey |
| Green Salad | Fresh and Light | Crisp and Crunchy |
Presentation Tips
Presenting your ribs with style is key to an appetizing spread. Here’s how to make your ribs irresistible at first glance:
- Use a Large Platter: A big wooden board or platter offers rustic charm.
- Add Garnishes: Fresh herbs or a sprinkle of green onions add color.
- Layer the Ribs: Stack them for a bountiful look.
- Sauce on the Side: Keep extra sauce in a bowl for dipping.
- Include Tongs: They make serving and grabbing ribs easier.
- Provide Plenty of Napkins: Ribs are messy; help your guests stay clean.
Remember, the eyes eat first. A well-presented meal starts the dining experience before the first bite. Arrange your sides in bowls and dishes that contrast with the ribs, making the table pop with variety.
Keep the table setting simple to let the food shine. Most importantly, serve everything with a warm smile. Your guests will feel the love and care put into the meal, ensuring it’s not just delicious, but also memorable.
Troubleshooting Common Issues
Understanding common problems and knowing how to fix them can turn a rib disaster into a delectable success. Let’s dive into troubleshooting and ensure your next barbecue is nothing short of amazing.
Overcooking Problems
It’s a fine line between perfectly cooked and overdone ribs. If your ribs turn out more like jerky than juicy, you might be facing overcooking issues. Here are some tips to keep those ribs from drying out:
- Check the Temperature: Your smoker or oven might be hotter than you think. Use an oven thermometer to ensure accuracy.
- Reduce Cooking Time: If the meat’s falling off the bone too much, try reducing the second phase by 30 minutes.
- Wrap with Care: During the second phase, wrapping the ribs in foil should be snug but not too tight. This traps moisture without squeezing out the juices.
Still struggling? Here’s a quick table to help:
| Problem | Solution |
| Dry and Tough | Lower the smoker’s temperature and check for doneness earlier. |
| Falling Apart | Shorten the foil-wrapped cooking phase to preserve texture. |
Flavor Adjustments
Sometimes, ribs taste just okay, not wow. The good news is, flavor is easy to adjust. Here’s how to kick it up a notch:
- Rub Right: Apply your spice rub liberally. It should fully coat the ribs for maximum flavor.
- Sauce Secrets: Add sauce during the last 30 minutes. This prevents burning and ensures a tasty glaze.
- Wood Choices: Different woods impart different flavors. Experiment with hickory, apple, or cherry for unique tastes.
If you’re still not satisfied, consider these adjustments:
| If Ribs Are Too… | Try… |
| Bland | Increasing the spice in your rub or marinating overnight. |
| Sweet | Adding a touch of vinegar or mustard to the sauce. |
| Spicy | Reducing the amount of chili or pepper in your rub. |
Remember, taste is personal. Don’t be afraid to experiment to find your perfect rib flavor. With each cook, you’ll learn and improve. Soon, you’ll have a recipe that’s all your own.
Frequently Asked Questions
What Temperature Should Ribs Be At 321?
For the 3-2-1 ribs method, aim for an internal temperature of 190°F to 205°F. This ensures tender, juicy ribs. Always use a meat thermometer for accuracy.
Is 321 Or 221 Better For Baby Back Ribs?
The 321 method typically results in more tender baby back ribs than the 221 method, making it a popular choice for fall-off-the-bone textures.
How Long Do You Cook Ribs At 225?
Cook ribs at 225°F for about 3 to 4 hours. Check for tenderness and internal temperature of 195°F to 203°F before serving.
Do You Wrap 321 Ribs In Foil Or Butcher Paper?
For 3-2-1 ribs, you can wrap them in either foil or butcher paper. Foil locks in more moisture, while butcher paper allows for a firmer bark. Choose based on your texture preference.
Conclusion
Ready to wow your guests with mouthwatering ribs? The 3 2 1 method simplifies it. Remember these steps for tender, fall-off-the-bone goodness. Slow cook them first. Next, wrap with foil. Finally, slather on your favorite sauce. Each phase brings out incredible flavors.
This technique never fails to deliver perfect ribs. Give it a try. Your barbecue skills will shine. Friends and family will ask for your secret. Just smile and share the magic of the 3 2 1 ribs method. Grill master status is now within your reach.
Enjoy every savory bite!