Every product is independently reviewed and selected by our editors. If you buy something through our links, we may earn an affiliate commission at no extra cost to you.
A gas fireplace adds warmth and comfort to any home, but when it suddenly stops staying lit, the thermopile is often to blame. With age and regular use, this crucial component can weaken or fail, leaving your fireplace unable to operate as it should.
Since the thermopile powers the gas valve in most modern fireplaces, a weak or faulty one is among the leading causes of ignition failure.
Knowing how it works, recognizing the warning signs, and learning the steps for proper replacement are essential to keeping your fireplace dependable and efficient.
Gas Fireplace Thermopile Replacement: Quick Fixes & Expert Tips
In this guide, you’ll discover quick fixes and expert tips to troubleshoot and replace your thermopile, so your fireplace runs smoothly again.
Signs Of A Faulty Thermopile
Gas fireplaces rely on a small but important part called the thermopile to work properly. This component creates the electrical current needed to keep the gas valve open. Over time, the thermopile can wear out or fail. Recognizing the signs of a faulty thermopile helps avoid bigger problems and keeps your fireplace safe and warm. Knowing these signs early makes repair or replacement easier and faster.
Common Symptoms
A faulty thermopile shows clear signs that your gas fireplace needs attention. The most obvious symptom is the fireplace not staying lit. If the flame keeps going out or does not ignite at all, the thermopile might be weak or broken.
Other common symptoms include:
- Intermittent flame:The flame may flicker or go out suddenly.
- Long ignition time:The fireplace takes much longer to light than usual.
- Weak or no pilot light:The pilot light may be dim or fail to stay on.
- No heat output:The fireplace does not produce enough heat despite running.
- Thermostat failure:The thermostat does not respond or control the fireplace.
| Symptom | Description | Possible Cause |
| Flame goes out | Flame cannot stay lit continuously | Weak thermopile output |
| Slow ignition | Long delay before flame appears | Reduced thermopile voltage |
| No heat | Fireplace runs but produces little heat | Thermopile not powering gas valve |
Testing the thermopile voltage with a multimeter can confirm if it needs replacement. A normal thermopile produces around 300 millivolts or more. Below this, the thermopile is likely faulty.
Safety Concerns
A faulty thermopile can cause serious safety risks. This part controls the gas valve that supplies fuel to the fireplace. If it fails, gas may leak or the flame may go out unexpectedly, leading to dangerous situations.
Key safety concerns include:
- Gas leaks:A broken thermopile may fail to close the gas valve, causing leaks.
- Carbon monoxide buildup:Poor combustion due to weak flame can increase harmful gases inside the home.
- Fire hazards:Uncontrolled gas or flame increases the risk of fire.
- Heating failure:No heat during cold weather affects comfort and safety.
To stay safe, check your gas fireplace regularly for signs of thermopile problems. Do not ignore pilot light issues or strange smells near the fireplace. Installing a carbon monoxide detector nearby adds a layer of protection.
Always hire a professional technician to inspect and replace the thermopile. Proper installation ensures the gas valve works correctly and prevents leaks or malfunctions.
Tools And Materials Needed
Replacing a gas fireplace thermopile requires specific tools and materials to ensure a safe, efficient job. Using the correct tools helps avoid damage and speeds up the process.
Before starting, gather everything needed to complete the replacement smoothly. This section covers the essential tools and how to pick the right thermopile for your fireplace model.
Essential Tools
Having the right tools makes thermopile replacement easier and safer. Most tools are common household items, but some are specific to gas fireplace work.
- Multimeter:Measures voltage and resistance to test the thermopile before and after replacement.
- Screwdrivers:Both flathead and Phillips types are needed to remove panels and screws.
- Adjustable wrench:Helps loosen and tighten nuts on gas connections.
- Needle-nose pliers:Useful for gripping small parts and wires.
- Wire stripper/cutter:Needed if you must trim or reconnect wires.
- Flashlight:Provides extra light inside the fireplace area.
- Work gloves:Protect your hands from sharp edges and hot parts.
- Replacement thermopile:The new part that matches your fireplace model.


Keep all tools organized on a tray or small table nearby. This setup prevents misplacing parts during the job. Also, ensure the gas supply is off before starting work to avoid accidents.
Choosing The Right Thermopile
Picking the correct thermopile ensures your fireplace works safely and efficiently. Thermopiles vary in size, voltage, and connection type. Using a wrong part can cause poor performance or damage.
Follow these steps to select the right thermopile:
- Check your fireplace manual:Find the exact model number and thermopile specifications.
- Match voltage rating:Most thermopiles produce 300-750 millivolts; use one with the same output.
- Compare length and shape:The new thermopile should fit the mounting area without bending or stretching.
- Verify connection type:Look at the wire terminals or connectors to ensure compatibility.
| Thermopile Feature | What to Check | Why It Matters |
| Voltage Output | Match millivolt rating (300-750 mV) | Ensures proper gas valve operation |
| Physical Size | Length and mounting bracket shape | Fits securely without stress or damage |
| Connection Type | Wire leads or quick-connect terminals | Allows easy and safe electrical hookup |
Buy from trusted suppliers or directly from the fireplace manufacturer. Avoid generic parts that may not meet safety standards. Correct selection prevents future repairs and keeps your fireplace running smoothly.
Preparing For Replacement
Replacing the thermopile in a gas fireplace requires careful preparation. This step is important to ensure safety and make the replacement process smooth. Taking time to prepare helps avoid accidents and damage to the fireplace. This section explains how to get ready by turning off the gas and power and accessing the fireplace components.
Turning Off Gas And Power
Safety is the top priority before starting any work on a gas fireplace. The first step is to turn off the gas supply. This stops any gas from flowing and reduces the risk of leaks or fire. Locate the gas valve near the fireplace. It often looks like a small lever or knob.
- Turn the gas valve clockwise to close it.
- Check that the gas is off by trying to light the fireplace (it should not ignite).
Next, turn off the power to the fireplace. Many gas fireplaces use an electric ignition system or blower. Cutting power prevents shocks and accidental ignition.
- Find the switch or circuit breaker that controls the fireplace.
- Switch it off or flip the breaker.
- Test that the fireplace does not turn on.
| Step | Action | Why |
| 1 | Turn off gas valve | Prevent gas leaks and fire risk |
| 2 | Switch off power or breaker | Avoid electric shock and accidental ignition |
| 3 | Confirm gas and power are off | Ensure safety before working |
Completing these steps creates a safe work environment. Never skip turning off gas and power before replacing the thermopile.
Accessing The Fireplace Components
After securing safety, access the parts inside the fireplace. The thermopile is usually located near the pilot light assembly. Accessing it requires removing the glass panel or front cover.
Follow these tips to access components safely:
- Wait for the fireplace to cool down to avoid burns.
- Remove screws or clips holding the glass or cover in place.
- Lift out the glass panel carefully and set it on a soft surface.
- Locate the pilot assembly and thermopile inside the fireplace.
Use a flashlight to see clearly inside. Take pictures before disconnecting any parts. This helps during reassembly.
| Tool | Purpose |
| Screwdriver | Remove screws on glass or cover |
| Flashlight | Improve visibility inside fireplace |
| Soft cloth or towel | Place glass panel safely |
Careful handling prevents damage to fragile parts. Keep all screws and clips in a safe place to avoid losing them. Proper access makes the thermopile replacement easier and faster.
Removing The Old Thermopile
Replacing a gas fireplace thermopile starts with removing the old one carefully. The thermopile is a small device that generates the voltage needed to keep your fireplace running safely. Removing it requires attention to detail and safety.
This process involves two main steps: disconnecting the wires and unscrewing the thermopile itself. Each step must be done with care to avoid damage or injury. Below is a clear guide to help you remove the old thermopile efficiently.
Disconnecting Wires
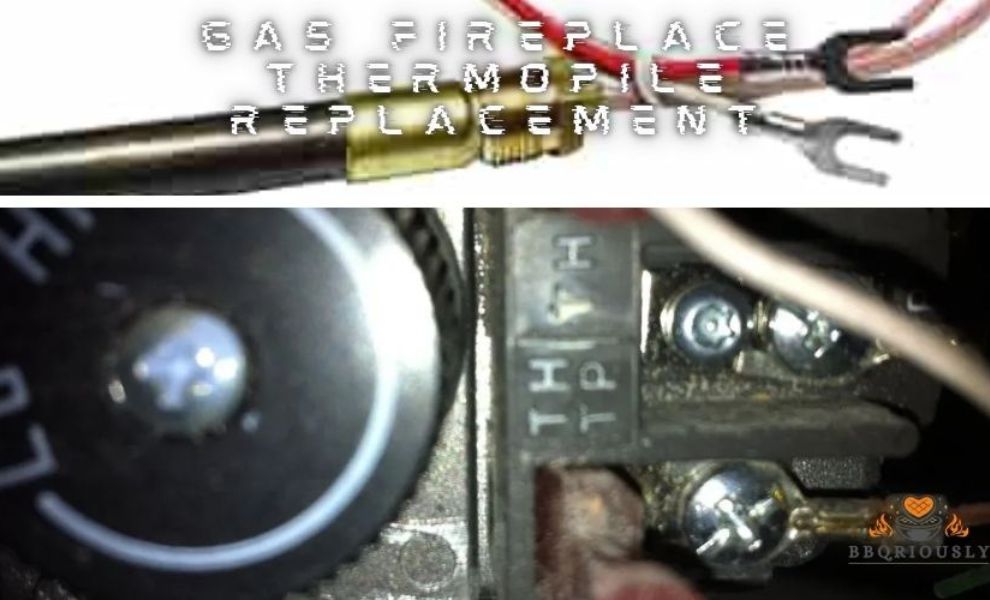
Before handling any electrical parts, turn off the gas supplyand make sure the fireplace is completely cool. Safety first. The thermopile has two wires connected to it. These wires carry the small voltage the thermopile produces to the gas valve.
Disconnecting these wires is simple but requires careful handling to avoid breaking them or mixing up connections later.
- Locate the wires:Look near the thermopile for two thin wires, usually attached with small connectors.
- Note wire positions:Take a photo or label the wires to remember which goes where.
- Use pliers or fingers:Gently pull the connectors from the thermopile terminals. Do not pull the wires themselves.
- Inspect wires:Check for any damage or corrosion that might need repair before installing the new thermopile.
Here is a simple checklist to follow:
| Step | Action | Tip |
| 1 | Turn off gas and cool fireplace | Prevent accidents and burns |
| 2 | Locate thermopile wires | Usually thin and connected with small clips |
| 3 | Label or photograph wires | Helps reconnect later |
| 4 | Gently disconnect wires | Pull connectors, not wires |
Unscrewing The Thermopile
After disconnecting the wires, the next step is to remove the thermopile from its mounting. This part is usually fixed with a small screw or nut. Use the right tools to avoid damaging the thermopile or surrounding parts.
Follow these steps for unscrewing:
- Identify the mounting point:The thermopile is held close to the pilot flame assembly.
- Select the correct tool:Usually, a small screwdriver or wrench fits the screw or nut.
- Turn counterclockwise:Unscrew slowly to avoid stripping the threads.
- Keep screws safe:Place them in a small container to avoid losing them.
- Remove the thermopile:Once free, carefully pull it out without bending the rod.
Use this table to match common tools with thermopile screw types:
| Screw Type | Tool Needed | Notes |
| Phillips head | Phillips screwdriver 1 or 2 | Standard cross-shaped screw |
| Hex nut | Small wrench or socket set | Often found in metal brackets |
| Flat head | Flathead screwdriver | Less common but possible |
Important:Avoid forcing the thermopile if it feels stuck. Check for hidden clips or screws. Damaging the pilot assembly can increase repair costs.
Installing The New Thermopile
Replacing the thermopile in a gas fireplace is a key step to keep it working safely and well. Installing the new thermopile requires care and attention to detail. The thermopile must be placed correctly and connected properly to ensure the fireplace lights and stays on reliably. This section explains the main steps to install the new thermopile with clear instructions and tips.
Proper Placement
The new thermopile must sit in the right spot to sense heat and produce voltage. Place it close to the pilot flame, but not touching the flame directly. The heat from the pilot flame activates the thermopile, so proper placement is critical.
- Position the tip:The thermopile tip should be in the pilot flame’s center area.
- Distance from flame:Keep the tip about 1/4 inch away from the flame.
- Secure mounting:Use the mounting bracket or screws to hold the thermopile steady.
- Avoid contact:Do not let the thermopile touch metal parts that get hot.
Check the following table for common placement mistakes and their effects:
| Placement Issue | Effect on Fireplace |
| Too far from flame | Weak voltage; fireplace won’t stay lit |
| Touching flame directly | Damage to thermopile; short lifespan |
| Loose mounting | Inconsistent heat sensing; unreliable operation |
Double-check the position before finalizing. A well-placed thermopile ensures your fireplace works smoothly every time.
Reconnecting Wires
After placing the thermopile, reconnect the wires carefully. The wires carry the voltage from the thermopile to the gas valve to control the gas flow. Incorrect wiring can cause the fireplace to fail or become unsafe.
Follow these steps for safe and correct wiring:
- Turn off the gas supply and power:Safety first. Make sure no gas or electricity is flowing.
- Note wire connections:Write down or take a picture of the old wire setup before disconnecting.
- Connect wires firmly:Attach the wires to the new thermopile terminals. Tighten screws or use clip connectors.
- Match wire colors:Usually, red and black wires are used. Connect matching colors to correct terminals.
- Check for corrosion:Clean any rust or dirt on wire ends before connecting.
The following table shows common wire connection tips:
| Wire Color | Common Terminal | Note |
| Red | Thermopile positive (+) | Check manual for exact terminal |
| Black | Thermopile negative (–) | Ensure secure connection |
After reconnecting, gently tug each wire to confirm it is secure. Loose wires cause poor contact and fireplace failure. Finally, restore gas and power, then test the fireplace for proper operation.
Testing The New Thermopile
After replacing the gas fireplace thermopile, testing the new unit is crucial to ensure it works correctly. The thermopile generates voltage by converting heat from the pilot light. This voltage powers the gas valve, allowing the fireplace to operate safely. Testing confirms the thermopile produces enough voltage and functions properly. This step prevents future issues like the fireplace not staying lit or shutting off unexpectedly.
Checking Voltage Output
Testing the voltage output of the new thermopile requires a multimeter. This tool measures the electrical voltage the thermopile produces under heat. Follow these steps to check the voltage output:
- Turn on the pilot light and let it heat the thermopile for about 5 minutes.
- Set your multimeter to measure millivolts (mV).
- Connect the multimeter probes to the thermopile terminals.
- Read the voltage displayed on the multimeter.
Normal voltage outputfor a good thermopile ranges between 300 and 750 millivolts. Values below 300 mV indicate a weak or faulty thermopile. Here is a quick reference table:
| Voltage (mV) | Thermopile Condition |
| 300 – 750 | Good |
| Below 300 | Weak or Faulty |
| Above 750 | Unusually High (Check for errors) |
Repeat this test a few times to ensure consistent readings. If the voltage is too low, the thermopile may need adjustment or replacement. Ensure the pilot flame fully covers the thermopile sensor for best results.
Ensuring Proper Operation
After verifying voltage, confirm the thermopile controls the gas valve correctly. Proper operation means the valve stays open while the pilot light is on and closes when the flame goes out. Follow these checks:
- Turn the fireplace off and on several times to see if the pilot lights easily.
- Observe if the main burner lights and stays on without interruption.
- Check that the gas valve shuts off when the pilot light goes out.
Improper operation signs include:
- The fireplace won’t stay lit.
- The gas valve does not open or close properly.
- Flame flickers or goes out unexpectedly.
Use the following checklist to confirm proper operation:
| Test | Expected Result | Action if Failed |
| Pilot light ignition | Pilot lights quickly and stays lit | Check thermopile voltage and connections |
| Main burner operation | Main burner lights and stays on | Inspect gas valve and thermopile |
| Gas valve response | Valve closes when pilot light is off | Replace faulty thermopile or valve |
Ensuring proper operation keeps your fireplace safe and functional. Regular testing after replacement avoids hazards and costly repairs.
Maintenance Tips
Proper maintenance of your gas fireplace thermopile ensures it works safely and efficiently. Regular care helps prevent unexpected failures and costly repairs. Simple steps keep the thermopile in good shape and extend its lifespan.
Regular Cleaning
Cleaning the thermopile regularly removes dust, soot, and debris that build up over time. Dirt can block heat from reaching the thermopile, causing it to produce less voltage and fail to ignite the fireplace.
Follow these cleaning tips:
- Turn off the gas supply and let the fireplace cool completely.
- Use a soft brush or compressed air to gently remove dust from the thermopile.
- Clean nearby components like the pilot light assembly to prevent soot buildup.
- Wipe the thermopile with a dry cloth; avoid using water or cleaning solutions.
- Inspect the thermopile for cracks or corrosion during cleaning.
Keep a cleaning schedule. Aim to clean the thermopile at least once a year, or more often if you use the fireplace frequently.
| Cleaning Step | Tools Needed | Frequency |
| Remove dust and soot | Soft brush, compressed air | Yearly |
| Wipe thermopile | Dry cloth | Yearly |
| Inspect for damage | Visual check | Yearly |
Extending Thermopile Life
Protecting the thermopile from damage lengthens its service life. Avoiding common issues keeps the fireplace reliable and safe.
Use these tips:
- Avoid moisture exposure.Moisture can corrode the thermopile. Keep the area dry and check for leaks.
- Prevent physical damage.Handle the thermopile carefully during cleaning or repairs.
- Maintain proper airflow.Clear vents and chimneys to prevent overheating and soot buildup.
- Use the fireplace regularly.Regular use helps keep the thermopile functioning well.
- Schedule professional inspections.A technician can spot early signs of wear or problems.
Here is a simple checklist to extend your thermopile’s life:
| Tip | Action | Benefit |
| Avoid moisture | Keep fireplace dry | Prevents corrosion |
| Handle with care | Use gentle cleaning | Prevents breakage |
| Clear airflow | Clean vents and chimney | Prevents overheating |
| Use regularly | Light fireplace often | Maintains function |
| Professional check | Annual technician visit | Early problem detection |
Frequently Asked Questions
What Is A Gas Fireplace Thermopile?
A gas fireplace thermopile converts heat into electrical energy. It powers the gas valve and ignition system. This component ensures your fireplace operates safely and efficiently by generating the needed voltage from the pilot flame.
When Should I Replace My Thermopile?
Replace the thermopile if the fireplace won’t stay lit. Signs include weak pilot flame or frequent shutdowns. Testing voltage output can confirm failure. Regular inspection helps maintain safe and reliable fireplace operation.
How Do I Test A Fireplace Thermopile?
Use a multimeter to test the thermopile’s voltage output. Disconnect the thermopile wires and measure millivolts while the pilot is lit. A healthy thermopile produces around 350 millivolts. Lower readings indicate the need for replacement.
Can I Replace A Thermopile Myself?
Yes, replacing a thermopile is possible with basic tools and safety precautions. Turn off the gas and power before starting. Follow manufacturer instructions carefully to avoid damage or safety risks. When unsure, consult a professional technician.
Conclusion
Replacing a gas fireplace thermopile keeps your heater working well. It helps the pilot light stay lit and the fire burn safely. Regular checks prevent sudden problems and save money later. Doing the replacement carefully means your fireplace stays warm and cozy.
Small fixes make a big difference in comfort and safety. Trust your skills or ask for help if needed. Enjoy a warm home with a well-maintained gas fireplace all winter.