
Every product is independently reviewed and selected by our editors. If you buy something through our links, we may earn an affiliate commission at no extra cost to you.
Getting your charcoal grill to the right temperature is key to mastering the art of outdoor cooking. Whether you’re aiming for a quick sear on a steak or slow-cooking ribs to perfection, controlling heat is essential.
Charcoal quality matters too—lump charcoal tends to burn hotter than briquettes. Stacking your coals correctly can also make a significant difference. Properly arranged coals promote better air circulation, which is key to a hotter fire.
How To Make Charcoal Grill Hotter: Sizzling Secrets Unveiled
In the following sections, we’ll dive into easy, practical steps to take your grilling game to the next level, ensuring your charcoal grill reaches the searing hot temperatures you desire. Let’s turn up the heat!
Types Of Charcoal
Getting your charcoal grill to reach higher temperatures can be crucial for that perfect sear on a steak or crispy skin on grilled chicken. The heat output can be influenced by the type of charcoal you use. Understanding the differences between lump charcoal and briquettes will help you achieve the desired heat for your grilling needs.
Lump Charcoal
Lump charcoal is the go-to choice for grill enthusiasts seeking a hotter and cleaner burn. It’s made from pure hardwood, without any additives, resulting in a high-quality fuel for your grill. Here’s why lump charcoal could be your best bet for a hotter grill:
- Quicker to Light: Lump charcoal catches fire faster, reducing your prep time.
- Higher Temperatures: It burns hotter, which is perfect for searing meats.
- Less Ash: Produces minimal ash, making cleanup easier.
When using lump charcoal, remember these tips:
- Arrange the charcoal in a mound at the center to promote air circulation.
- Use a chimney starter for an even and efficient ignition.
- Control the airflow with vents to adjust the temperature.
Consider the following comparison:
| Lump Charcoal | Briquettes |
| Faster Lighting | Slower to Light |
| Higher Heat Output | Consistent Heat |
| Less Ash Produced | More Ash |
Briquettes
Briquettes are another popular option for grilling, known for their consistent heat and burn time. They are made from compressed charcoal dust and binders, which allows them to maintain a steady temperature for an extended period. Here’s why briquettes could be right for your grilling sessions:
- Uniform Shape: Their uniformity ensures a predictable and even burn.
- Longer Burn Time: Ideal for low and slow cooking methods.
- Cost-Effective: Generally cheaper than lump charcoal.
Maximize the potential of briquettes with these pointers:
- Stack the briquettes in a pyramid shape before lighting for a solid foundation.
- Allow them to ash over fully before spreading for even heat distribution.
- Keep the grill lid closed as much as possible to maintain temperature.
Briquettes are a solid choice when you need a prolonged, stable heat source for dishes like smoked ribs or pulled pork. They may not reach the same high temperatures as lump charcoal, but their predictability is a significant advantage for certain cooking styles.
Ventilation Techniques
Understanding ventilation techniques is key to mastering heat control. It’s not just about the charcoal; how you manage airflow plays a pivotal role. Let’s explore how to make your charcoal grill hotter with effective ventilation.
Adjusting Air Vents
Your charcoal grill has built-in features to control the heat – the air vents. These vents are crucial for managing the grill’s temperature. Here’s how to use them:
- Open the Bottom Vents: These vents, also known as intake vents, let air into the grill. More air means more oxygen for the coals, which makes them burn hotter.
- Control the Top Vents: The vents on the lid, or exhaust vents, let heat and smoke escape. Adjust them to maintain a consistent temperature.
Remember, opening both vents will increase the heat, while closing them will cool down the grill. You can use a simple table to remember this:
| Bottom Vent | Top Vent | Temperature Effect |
| Open | Open | Hotter |
| Partially Open | Partially Open | Moderate |
| Closed | Closed | Cooler |
It’s all about balance and finding the right settings for your cooking needs. Keep an eye on the temperature gauge if you have one, and make adjustments as you cook.
Creating A Draft
A draft is another effective way to heat your grill. It works by pulling fresh air through the bottom vent and pushing hot air out the top. Here’s how you can create a draft:
- Start with both vents fully open to get the coals ignited and heated up quickly.
- Once your coals are lit and covered with a light layer of ash, place your food on the grill.
- Adjust the top vent to control the draft. A wider opening creates a stronger draft and a hotter grill.
Creating the right draft is like steering a ship; you need to make small adjustments to stay on course. Keep the following tips in mind:
- Monitor your grill’s temperature with a thermometer and adjust the vents as necessary.
- Wind can affect the draft. Position your grill so that the wind works with the draft, not against it.
- Be patient. It takes time for changes to the vents to affect the grill’s temperature.
By mastering the draft, you ensure your grill gets hotter faster and stays hot throughout your cookout. This means better char on your meats and veggies, and a more enjoyable grilling experience. Keep practicing, and soon you’ll have the perfect heat for any dish you’re grilling.
Charcoal Placement
Getting your charcoal grill hotter is key for perfect grilling. Charcoal placement plays a big part. The right setup can mean the difference between okay and great food. Let’s dive into techniques that help.
Mound Technique
One effective way to increase heat is the Mound Technique. This involves piling charcoal into a tight mound in the center of the grill. Why does this work? It focuses the heat into one spot, creating a hotter zone. Here’s how to do it:
- Start with clean grates and an empty grill.
- Gather your charcoal. Lump charcoal is best for high heat.
- Pile the charcoal into a mound at the center of the grill.
- Use a lighter fluid or a chimney starter to light the charcoal.
- Wait for the charcoal to become white-hot before spreading slightly, if needed.
This method is great for searing meat or cooking anything that needs high heat quickly. Just remember, the mound concentrates heat in the center. Foods placed on the edge cook slower.
Two-zone Setup
For more control, try a Two-Zone Setup. This splits your grill into a hot zone and a cooler zone. Here’s what to do:
- Divide your grill into two sides.
- Place a large amount of charcoal on one side. This is your hot zone.
- Leave the other side empty. This is your cooler zone.
- Light the charcoal and let it heat up.
This setup is perfect for different cooking needs. Start foods on the hot side for searing. Then, move them to the cooler side to finish cooking without burning. It’s also great for cooking foods at different speeds. Chicken and vegetables? Start the chicken on the hot side, veggies on the cool side. Swap as needed.
Remember, managing your grill’s heat is all about charcoal placement. Experiment with these techniques to find what works best for your grilling style.
Using Lighter Fluids
Let’s explore the types of lighter fluids available and the essential safety tips to keep your grilling experience both enjoyable and safe.
Types Of Lighter Fluids
Lighter fluids are a popular choice for getting charcoal grills to reach higher temperatures. They are designed to ignite quickly and burn consistently, providing an even heat source for grilling. Here’s a closer look at the options:
- Standard Lighter Fluid: A petroleum-based fluid, it’s the most common type available.
- Electric Charcoal Starter: This is a tool rather than a fluid but deserves mention. It uses electricity to heat up and ignite the coals.
- Eco-Friendly Alternatives: Made from renewable resources, these fluids are less harmful to the environment.


When choosing a lighter fluid, consider the ignition point and burn time. A higher ignition point means the fluid is less volatile and safer to use. Burn time affects how long your coals stay hot. Here’s a simple table comparing these aspects:
| Type of Lighter Fluid | Ignition Point | Burn Time |
| Standard Lighter Fluid | Low | Short |
| Electric Charcoal Starter | N/A | Varies |
| Eco-Friendly Alternatives | High | Long |
Remember, the choice of lighter fluid can impact flavor, so pick one that suits your taste preferences and grilling style.
Safety Tips
While lighter fluids can be great for heating up your grill, safety should always be your top priority. Here are some crucial safety tips:
- Read Instructions: Before using any lighter fluid, read the label carefully.
- Keep Distance: When applying fluid, keep your face and body away from the grill.
- Wait Before Lighting: Allow the fluid to soak into the coals for a minute to prevent flare-ups.
- Never Add Fluid to Lit Coals: Adding fluid to burning coals can cause a dangerous flare-up.
Remember, the grill surface can remain hot long after the flames are gone, so handle with care and give it time to cool down. By following these safety practices, you can enjoy a hotter grill and delicious barbecue while keeping risks at bay.
Adding Cooking Oils
A common challenge is getting the grill hot enough for that perfect sear. One trick you might not have considered is Adding Cooking Oils. Not only do oils play a vital role in cooking, but they can also impact the heat of your grill. Let’s dive into how you can use oils to crank up the temperature and get those grills blazing.
Oil On Coals
Adding oil to your charcoal can significantly increase the heat output. But it’s not as simple as just throwing oil onto the coals. You need the right approach to make it safe and effective:
- Choose the Right Oil: High-smoke point oils like canola or peanut oil work best.
- Apply with Care: Lightly drizzle oil over the coals before lighting them. This can create a more intense flame.
- Watch the Flames: Be ready to manage flare-ups as oil can ignite quickly.
Additionally, consider the following table for the best oils to use and their smoke points:
| Oil Type | Smoke Point |
| Canola Oil | 400°F (204°C) |
| Peanut Oil | 450°F (232°C) |
| Safflower Oil | 510°F (266°C) |
Using oil on your coals is a clever hack to boost your grill’s temperature. Just a small amount can make a big difference, turning up the heat for that unbeatable char.
Oil On Food
Brushing oil directly onto your food before grilling is another great way to enhance heat transfer. Here’s why it works:
- Better Searing: Oil creates a surface that heats up fast, giving you a better sear.
- Even Cooking: It helps distribute heat evenly across the food.
- Flavor and Moisture: Oils add flavor and keep food from drying out.
When oiling your food, keep these tips in mind:
- Pat your food dry before applying oil. Water and oil don’t mix, and moisture prevents proper searing.
- Use a brush or your hands to apply a thin, even layer of oil on the food.
- Choose your oil based on the flavor you want and the cooking temperature.
Remember, a little goes a long way. You want enough oil to cover the surface but not so much that it causes excess smoke and flare-ups. Enjoy those juicy, perfectly grilled flavors with a touch of oil!
Preheating The Grill
Making your charcoal grill hotter starts with preheating the grill. This step is crucial. It sets the stage for cooking. Think of it as warming up before a sprint. You wouldn’t skip it. So, don’t skip preheating your grill. Let’s dive into how to do it right.
Timing
Timing is key when preheating a charcoal grill. You want it hot and ready, but not burning out. Here’s what to do:
- Start by cleaning your grill. Old ash can block airflow.
- Stack your charcoal properly. Use a chimney starter for ease.
- Light the charcoal and let it burn until it’s covered with ash. This usually takes about 15 minutes.
Remember, patience is important. Rushing can lead to uneven heat. Here’s a simple guide:
| Step | Action | Time |
| 1 | Clean grill | 5 minutes |
| 2 | Stack and light charcoal | 10 minutes |
| 3 | Wait for ash cover | 15 minutes |
After these steps, your grill should be hot. But, how hot? Let’s check.
Temperature Checks
Knowing the temperature of your grill is crucial. You need it hot, but not too hot. Here’s how to check:
- Use a grill thermometer. It’s a must-have tool.
- Place the thermometer on the grill grate.
- Wait a few minutes for an accurate reading.
What temperature should you aim for? It depends on what you’re cooking. Here’s a quick guide:
| Food | Temperature |
| Steaks | 450-500°F |
| Chicken | 350-400°F |
| Veggies | 350-375°F |
Adjust your grill vents to control the temperature. Open vents mean more air and heat. Closed vents mean less. Check the temperature regularly. This ensures your grill stays hot enough for cooking.
Using A Chimney Starter
This simple tool can make all the difference in your grilling experience, providing a consistent and scorching heat source for your charcoal grill. So let’s dive into how a chimney starter can turn up the heat on your grilling game.
How It Works
A chimney starter is a metal cylinder designed to quickly and evenly light charcoal. It’s incredibly straightforward to use. Here’s a step-by-step breakdown of the process:
- Fill the chimney: Start by filling the top part of the chimney with charcoal briquettes.
- Ignite: Next, place some lighter cubes or crumpled newspaper under the chimney and light it.
- Airflow: The construction of the chimney allows air to flow through, which is crucial for ignition.
- Wait: In about 15-20 minutes, the charcoal should be ashed over and ready to use.
- Pour: Carefully pour the hot coals onto your grill’s charcoal grate.
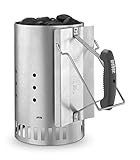
The chimney works by harnessing the principle of convection. As the fire starter burns, it creates heat and an upward flow of hot air. This air then pulls in more oxygen through the bottom and sides of the cylinder. The effect is a mini-furnace that turns charcoal into red-hot embers in no time.
Benefits
Using a chimney starter offers several advantages over traditional methods of starting a charcoal grill. Here are just a few:
- Faster: Chimneys get your coals hot and ready much quicker than other methods.
- Consistent Heat: It provides an even heat distribution, reducing the chances of hot and cold spots.
- No Chemical Taste: By eliminating the need for lighter fluid, your food won’t have any chemical aftertaste.
- Reusable: Chimney starters are durable and can be used repeatedly, making them a one-time investment.
- Safe: They reduce the risk of flare-ups associated with lighter fluid.
Besides these points, a chimney starter is also a champion of convenience and cost-effectiveness. It’s a straightforward tool that simplifies the grilling setup process, allowing you to focus on cooking and enjoying time with friends and family.
Plus, it’s a cost-effective solution, as you no longer need to buy lighter fluid. All these benefits come together to make the chimney starter a must-have for any grilling enthusiast looking to turn the heat up on their charcoal grill.
Maintaining Temperature
Maintaining the right temperature is not just about cranking up the heat; it’s about control and consistency. Whether you’re a seasoned griller or a novice, understanding how to keep your charcoal grill hot and ready for cooking is key to nailing those delicious barbecue flavors.
Monitoring Heat
Keeping a watchful eye on the grill’s temperature ensures your food cooks evenly and achieves the desired taste and texture. Start with a good thermometer; many grills come with a built-in gauge, but a digital probe thermometer can offer more accuracy. Here are some tips for monitoring the heat:
- Place the thermometer close to the food for the best reading.
- Check the temperature regularly, especially if you’re cooking for longer periods.
- Be mindful of the weather, as wind, temperature, and humidity can affect the grill’s heat.
It’s important to know your grill’s hot spots and cooler zones. This knowledge lets you manage where to place your food for either direct or indirect cooking. For instance, steaks need high direct heat, while a whole chicken benefits from slower, indirect heat.
Temperature Fluctuations:
| Condition | Impact | Action |
| Opening the Lid | Loses Heat | Keep lid closed when possible |
| Adding Charcoal | Increases Heat | Add sparingly and carefully |
| Excess Ash | Blocks Airflow | Clean out to maintain airflow |
Remember to always use heat-resistant gloves when handling the grill or adjusting the temperature. Safety first!
Adjusting Coals
Knowing how to adjust your coals is the secret to mastering your grill’s temperature. The arrangement of coals affects the intensity and distribution of heat. Use these strategies for adjusting your coals and maintaining an even temperature:
- Spread Coals Evenly: For a consistent high heat, spread the coals evenly across the grill.
- Two-Zone Fire: Create a hotter and a cooler zone by piling coals on one side of the grill.
- Stir Coals: Oxygen fuels fire. Stirring the coals can help knock off ash and improve airflow.
When your grill needs a heat boost, consider these actions:
- Add more coals to increase the temperature.
- Use a charcoal chimney to preheat coals before adding them to the grill.
- Open vents to let in more oxygen, which fans the flames.
Conversely, if the grill gets too hot, try the following:
- Remove some coals using tongs to lower the temperature.
- Close the vents partially to reduce oxygen and lower the heat.
- Spread the coals out to decrease the concentration of heat.
Coal Quality: Not all charcoal is created equal. High-quality lump charcoal tends to burn hotter and cleaner than briquettes. Always start with a good foundation for the best results.
With these tips, you’ll keep your grill at the perfect temperature for whatever you’re cooking. Patience and practice make perfect, so don’t be afraid to experiment and find what works best for your grill.
Frequently Asked Questions
How To Get Your Charcoal Grill Hotter?
Ensure your charcoal grill is clean to improve airflow. Use high-quality, dry charcoal for better heat. Arrange coals closer together to concentrate heat. Open vents fully to increase oxygen flow. Consider using a charcoal chimney for more efficient lighting and heating.
Why Is My Charcoal Grill Not Getting Hot Enough?
Your charcoal grill might not reach optimal heat due to insufficient airflow, wet or low-quality charcoal, or excessive ash build-up. Ensure the grill vents are open, use dry, high-quality charcoal, and regularly clean out ash for better heat control.
Does Putting A Lid On A Charcoal Grill Make It Hotter?
Yes, placing a lid on a charcoal grill can make it hotter by trapping heat and reducing air flow, which increases the temperature inside the grill.
Does Closing The Vent On A Charcoal Grill Make It Hotter?
Closing the vent on a charcoal grill reduces oxygen flow, which in turn lowers the temperature, making the grill cooler.
Conclusion
Mastering your charcoal grill’s heat is essential for perfect barbecues. Use quality charcoal and arrange it strategically. Ensure proper airflow by cleaning vents. Preheating is key. For extra heat, try a chimney starter. Remember, lid positioning makes a big difference.
Regular cleaning boosts performance. Your grill’s temperature will soar with these tips. Happy grilling and enjoy those delicious, perfectly-cooked meals every time!