Every product is independently reviewed and selected by our editors. If you buy something through our links, we may earn an affiliate commission at no extra cost to you.
Tri tip is a flavorful, tender cut of beef that shines when cooked right—but even the best-prepared tri tip can be ruined by poor slicing.
Learning how to cut tri tip properly is just as important as seasoning or grilling it.
The secret lies in understanding the direction of the grain and using the right cutting technique to maximize tenderness and preserve flavor.
How To Cut Tri Tip: A Step-by-Step Culinary Guide
Cutting tri tip correctly is key to keeping it tender and flavorful. This step-by-step guide shows you exactly how to slice it like a pro.
Choosing The Right Tri Tip
Mastering the art of cutting tri tip starts with a crucial step: choosing the right piece of meat. It’s not just about sharp knives and techniques. The quality, cut, and grade of the tri tip you select will greatly influence the tenderness and flavor of your meal.
Let’s dive into the essentials of picking the perfect tri tip for a mouthwatering experience.
Selecting Quality Meat
When it comes to tri tip, freshness and quality are key. A top-notch tri tip is rich in color and has a firm texture. Here’s what to look for:
- Marbling: Look for good marbling, the white flecks of fat within the meat. This fat melts during cooking, adding juiciness and flavor.
- Color: The meat should be a vibrant red. If it’s turning brown, it might not be as fresh.
- Texture: The meat should be firm to the touch, not slimy or sticky.
Additionally, consider the source of the meat:
- Grass-fed vs. Grain-fed: Grass-fed beef tends to be leaner and has a different flavor profile compared to grain-fed beef.
- Organic: Organic tri tip comes from cattle that were not given antibiotics or hormones and were fed organic feed.
Here’s a quick table to summarize:
| Quality Indicator | What to Look For |
| Marbling | Visible white fat flecks |
| Color | Vibrant red |
| Texture | Firm and not slimy |
| Type of Feed | Grass-fed or grain-fed |
| Organic Certification | No antibiotics or hormones, organic feed |
Remember: The best tri tip should look good, feel good, and come from a trusted source.
Understanding Cuts And Grades
Tri tip is a specific cut from the bottom sirloin subprimal cut of a steer. Knowing the difference between various beef cuts and grades is vital. Here are the basics:
- Cut: Tri tip is a triangular cut known for its lean nature and rich flavor. It’s perfect for grilling or roasting.
- Grade: Beef is graded based on marbling and age. The main grades are Prime, Choice, and Select. Prime has the most marbling, Choice has moderate marbling, and Select is leaner with less marbling.
Consider these points when choosing your tri tip:
- Prime grade tri tip is ideal for a special occasion due to its superior marbling and tenderness.
- Choice grade offers a balance of quality and value, suitable for most cooking methods.
- Select grade is more budget-friendly but may require careful cooking to keep it tender.
Here’s a table to help you compare:
| Grade | Marbling | Best For |
| Prime | High | Special occasions, grilling, roasting |
| Choice | Moderate | Everyday meals, various cooking methods |
| Select | Less | Budget-friendly, careful cooking |
Knowing these details ensures you pick a tri tip that suits your taste, budget, and cooking style. Choose wisely for the best results on your plate!
Preparing The Tri Tip
Starting with a high-quality cut of meat is key, and the tri tip is a top choice for its rich flavor and tenderness. Before it hits the grill, though, proper preparation is crucial. This means trimming and marinating to perfection. Let’s dive into the art of getting your tri tip ready for a feast to remember!
Trimming Excess Fat
Trimming the fat off your tri tip is a step you can’t skip. A little fat can keep the meat moist, but too much can cause flare-ups on the grill. Here’s how to do it right:
- Place the tri tip on a clean cutting board.
- Grab a sharp knife. A boning knife works well for this.
- Look for the thick, white fat cap and silvery skin, known as silver skin.
- Gently slide the knife under the silver skin, angling slightly upwards.
- With a smooth motion, move the knife along the length of the silver skin, removing it from the meat.
- Trim off large chunks of fat, but leave a thin layer for flavor.
- Make sure to remove any loose or hanging pieces.
Remember, your goal is to balance. You want enough fat for flavor, but not so much that it overwhelms the meat or causes issues while cooking.
Marinating For Flavor
A good marinade can transform your tri tip. It adds depth and complexity to the flavor. Here’s how to create a marinade that will make your meat mouthwatering:
| Ingredient | Quantity | Purpose |
| Oil (e.g., olive or canola) | 1/4 cup | Base of marinade, helps transfer flavor |
| Acid (e.g., vinegar or lemon juice) | 3 tablespoons | Tenderizes and adds zest |
| Soy sauce | 2 tablespoons | Adds umami and saltiness |
| Garlic, minced | 4 cloves | Aromatics that infuse flavor |
| Herbs (e.g., rosemary, thyme) | 1 tablespoon | Adds fresh, earthy notes |
| Pepper | 1 teaspoon | Spice and heat |
Whisk these ingredients in a bowl. Place your trimmed tri tip in a sealable bag. Pour the marinade over the meat. Seal the bag, removing as much air as possible. Massage the bag to ensure even coverage. Let it sit in the refrigerator.
A few hours is good, but overnight is best. This allows the flavors to penetrate deeply, resulting in a tri tip that’s delicious through and through.
Cooking Methods
Tri tip is a tasty and versatile cut of beef. It comes from the bottom sirloin. Many people love it for its rich flavor and tenderness. Knowing how to cook it right can make a big difference. Let’s talk about two popular methods: grilling and oven roasting.
Grilling Techniques
Grilling tri tip brings out its natural flavors. It’s perfect for a summer BBQ. Here are some tips for grilling:
- Prep the meat: Season your tri tip with salt, pepper, and your favorite spices. Let it sit at room temperature for about 30 minutes before grilling.
- Heat the grill: Preheat your grill to medium-high. If using charcoal, let the coals ash over.
- Cooking time: Grill the tri tip for 10 minutes on each side. This creates a nice crust.
- Check temperature: Use a meat thermometer. Aim for 130°F for medium-rare.
- Rest the meat: Let it rest for 10 minutes before cutting. This helps keep it juicy.
Remember, cutting against the grain makes the meat tender. Find the grain direction and slice accordingly.
Oven Roasting Tips
Oven roasting is another great way to cook tri tip. It’s easy and works well for a busy day. Here are some steps for oven roasting:
- Season well: Like grilling, start by seasoning your tri tip. Use herbs and spices to add flavor.
- Preheat oven: Set your oven to 375°F. This temperature works well for roasting.
- Roast: Place the tri tip in a roasting pan. Cook for about 10 minutes per pound.
- Check doneness: Use a thermometer to check the meat’s internal temperature. Aim for 130°F to 135°F for medium-rare.
- Let it rest: After taking it out of the oven, let the tri tip rest for 10 minutes before slicing. This step is crucial for keeping it juicy.
Both grilling and oven roasting can yield delicious results. The key is in the preparation and cooking technique. Slice against the grain for the best texture.
Resting The Meat
Cutting tri-tip like a pro begins long before the knife meets the meat. It starts with a crucial step often overlooked by eager diners: resting the meat. This pause in the cooking process allows the flavors to settle and the juices to redistribute, ensuring that each slice is as succulent and tasty as the last.
Let’s dive into the importance of this rest period and discover the optimal times needed to elevate your tri-tip from good to great.
Importance Of Resting
Think of resting your tri-tip as a short nap that recharges it for the ultimate taste experience. Here’s why it’s so vital:
- Moisture retention: Heat causes meat juices to move away from the center. Resting allows these juices to seep back throughout the meat.
- Even flavor: As the juices redistribute, they carry the seasoning with them, ensuring every bite is full of flavor.
- Better texture: A rested tri-tip offers a more tender chew, as the meat fibers relax and become less tough.
Not convinced? Consider this: slicing into meat too soon is like opening a shaken soda can — it results in a loss of all the good stuff. Here’s a table summarizing the perks of patience:
| Benefit | Explanation |
| Juiciness | Rest allows juices to thicken and cling to the meat fibers. |
| Flavor | Seasonings meld with juices, enhancing taste. |
| Texture | Meat softens, making it easier to cut and chew. |
Resting isn’t just a suggestion; it’s a critical step in serving up a mouth-watering tri-tip.
Optimal Resting Times
So, how long should you rest your tri-tip? The answer varies, but here’s a guide to help you nail it:
- Thickness: A general rule is to rest the meat for about 5 minutes per inch of thickness.
- Size: Larger cuts need more time. A 2-pound tri-tip does well with a 10-minute rest.
- Temperature: If you’re serving in a cold environment, tent the meat with foil to keep it warm.
Below is a quick-reference chart to determine the best resting time for your tri-tip:
| Weight of Tri-Tip | Resting Time |
| 1 lb | 5 minutes |
| 2 lb | 10 minutes |
| 3 lb | 15 minutes |
Remember, these times are guidelines. Factors like the exact heat of your grill or oven can affect the resting time needed. When in doubt, use a meat thermometer to ensure your tri-tip reaches the desired temperature before resting.
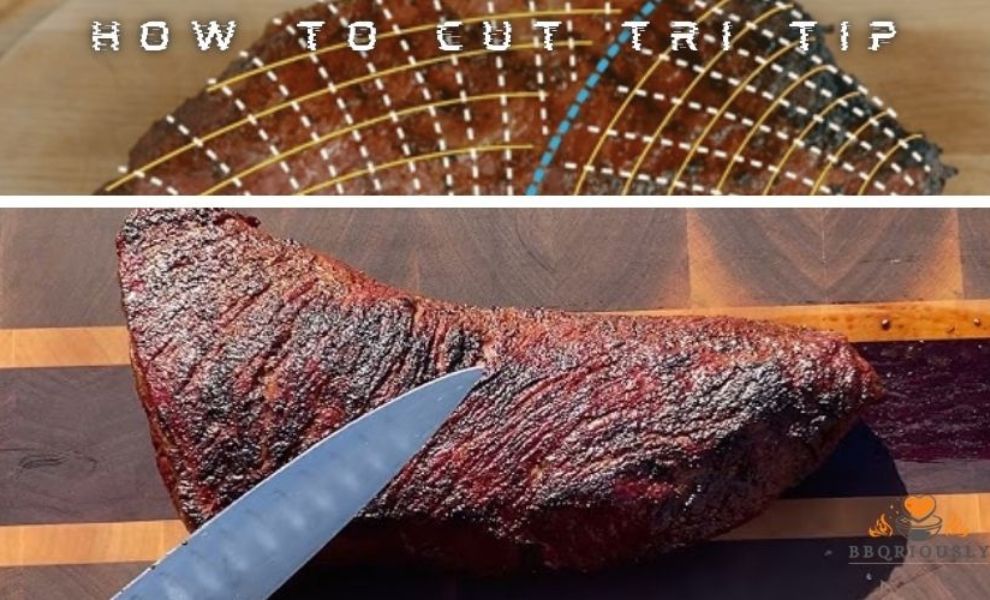
Identifying The Grain
When it comes to cutting a tri-tip, knowing where to slice is key. The tri-tip, a flavorful and versatile cut of beef, is often the star at barbecues and family dinners. To ensure every bite is tender and easy to chew, you must identify the grain of the meat.
This means understanding the direction in which the muscle fibers run. A proper cut across the grain transforms a good steak into a great one, with the perfect texture that melts in your mouth.
Recognizing Muscle Grain
Before you start slicing your tri-tip, it’s crucial to locate the muscle grain. Here’s a simple guide to help you:
- Look closely at the surface of the meat to spot the parallel lines. These lines indicate the direction of the fibers.
- Notice that the tri-tip has two different grain patterns due to its triangular shape. One side will have fibers running in a different direction than the other.
- Use your fingers to feel the texture of the meat if the visual cues are not clear. Running your fingers against the grain, you should feel slight resistance.
The grain can be easier to spot on a cooked tri-tip, as the fibers become more pronounced. Keep this in mind if you’re slicing after cooking. Remember, patience and attention to detail will lead to the best results.
Impact On Slicing
The way you slice the tri-tip can make a world of difference in its texture and taste. Here’s why slicing against the grain matters:
- Texture: Cutting across the grain shortens the muscle fibers, resulting in a more tender bite.
- Juiciness: Proper slicing techniques help retain the juices, keeping the meat moist.
- Ease of Eating: Short fibers are easier to chew, making the eating experience more enjoyable.
Always use a sharp knife and hold the meat steady with a fork or tongs. Start by slicing the tri-tip in half at the point where the grains change direction. Then, slice each section across the grain into thin pieces. This will ensure that every slice is as tender as possible. Remember, the right slice turns a good meal into a feast for the senses!
Slicing Techniques
Let’s talk about cutting tri tip and the right slicing techniques. It might seem simple, but there’s a trick to it. Knowing how to slice it can make a big difference in how tender and tasty your meat is.
Let’s dive into the details, focusing on the angle of the knife and the thickness of your slices.
Angle Of The Knife
First up, let’s chat about the angle of the knife. You might not know this, but the angle you hold your knife at is super important. Here’s why:
- Against the grain: Always cut against the grain. This means slicing opposite the direction the muscle fibers run. It makes your meat more tender.
- 45-degree angle: Aim to hold your knife at about a 45-degree angle. This is the sweet spot for getting nice, even slices.
Think of it like this:
| Angle | Result |
| 90 degrees | Too thick, hard to chew |
| 45 degrees | Perfect, tender slices |
| 0 degrees | Too thin, falls apart |
Remember, a sharp knife is key. A dull knife can ruin your angle and make slicing tough.
Thickness Of Slices
Next, let’s talk about the thickness of your slices. This part is important for cooking and eating. Here’s a quick guide:
- Thin slices: Great for sandwiches or salads. Aim for about 1/4 inch thick.
- Thick slices: Best for main dishes. Go for about 1/2 inch thick.
Why does thickness matter?
- Thick slices keep more juice, so they’re juicier and more flavorful.
- Thin slices are easier to eat, especially in a sandwich.
Here’s a tip: Start thin, then go thicker if needed. It’s hard to make thick slices thinner, but easy to cut more if they’re too thin.
Remember, practice makes perfect. The more you slice, the better you’ll get. So, grab your knife and get slicing!
Serving Suggestions
After mastering the art of cutting tri tip, serving it in style is key to wowing your guests. The succulent slices deserve accompaniments that complement their rich flavors. Let’s delve into some serving suggestions that will turn your tri tip into a feast for the senses.
Pairing With Sides
Tri tip’s robust flavor pairs beautifully with a variety of sides. Consider the following options to create a balanced plate:
- Roasted Vegetables: A colorful array of roasted veggies adds both nutrition and visual appeal. Think bell peppers, zucchini, and asparagus.
- Grilled Corn: Sweet corn on the cob, grilled to perfection, offers a delightful contrast to the savory meat.
- Salad: A crisp, green salad dressed with a light vinaigrette cleanses the palate between bites.
- Garlic Bread: Warm, buttery garlic bread is perfect for mopping up any flavorful juices left on the plate.
- Potatoes: Whether baked, mashed, or roasted, potatoes are a classic companion to beef.
Here’s a simple table to help you decide which side dish to choose:
| Side Dish | Texture | Flavor Profile |
| Roasted Vegetables | Crisp-tender | Savory with a hint of char |
| Grilled Corn | Juicy | Sweet and smoky |
| Green Salad | Crisp | Fresh with a tangy note |
| Garlic Bread | Soft with a crusty edge | Rich garlic butter flavor |
| Potatoes | Varies | Hearty and comforting |
Sauces And Marinades
The right sauce or marinade can elevate your tri tip from good to great. Here are some mouthwatering ideas:
- Chimichurri: This herby, tangy sauce brings a fresh zing to the meat.
- BBQ Sauce: A classic choice, BBQ sauce adds a sweet and smoky layer of flavor.
- Red Wine Reduction: A sophisticated sauce that complements the beef’s richness.
- Horseradish Cream: For those who enjoy a bit of heat, this creamy sauce packs a punch.
- Teriyaki Glaze: A sweet and savory glaze that gives a nod to Asian cuisine.
Experiment with these marinades before cooking:
- Garlic and Herb: Olive oil, garlic, rosemary, and thyme create a classic flavor.
- Citrus and Soy: Orange juice, soy sauce, and ginger offer a bright, umami-packed marinade.
- Spicy Chipotle: Chipotle peppers and adobo sauce bring heat and depth.
Remember, marinating for a few hours or even overnight infuses the tri tip with intense flavor. Always let the meat rest before slicing to ensure it retains its juices.
Storing Leftovers
Once you’ve mastered the art of slicing tri-tip perfectly, you’ll often find yourself with delicious leftovers. Storing these leftovers properly is crucial to maintain their flavor and freshness for another meal. Let’s dive into the best ways to keep your tri-tip tasting great for days to come.
Best Practices For Storage
Keeping your tri-tip leftovers fresh starts with proper storage. Here’s what you need to know:
- Cool it down. Allow the meat to reach room temperature before storing. This prevents condensation inside the container, which can lead to sogginess or spoilage.
- Airtight containers are your best friend. Use a container that can seal tightly to keep air out and freshness in.
- Refrigeration is key. Store your tri-tip in the fridge as soon as it’s cooled. It’s best consumed within 3-4 days.
- Freezing is an option for longer storage. Wrap the meat tightly in plastic wrap, followed by aluminum foil or place it in a heavy-duty freezer bag.
- Label your leftovers. Note the date on the container or bag, so you’ll know how long the tri-tip has been stored.
Here’s a quick reference table for tri-tip storage:
| Method | Storage Time |
| Refrigerator (0-4°C / 32-40°F) | 3-4 days |
| Freezer (-18°C / 0°F or colder) | 2-3 months |
Remember, proper storage is essential to enjoy your tri-tip at its best!
Reheating Methods
Reheating your tri-tip correctly can make it just as succulent as the first time. Here’s how to bring back that freshly cooked taste:
- Oven: Preheat to 165°C (325°F). Place the tri-tip in an oven-safe dish, add a splash of broth for moisture, and cover with foil. Heat for about 10-15 minutes.
- Stovetop: Slice the meat and warm it in a skillet over medium heat with a bit of oil or broth. Stir occasionally until heated through.
- Microwave: Use a microwave-safe dish, cover the meat, and reheat on medium power in 30-second intervals, checking regularly.
Each method has its perks:
| Method | Perks |
| Oven | Even heating, retains moisture |
| Stovetop | Quick, good for individual servings |
| Microwave | Fastest, requires minimal effort |
To avoid drying out the meat, keep an eye on it while reheating. No one likes overcooked tri-tip! With these tips, your leftovers will be almost as good as when they were freshly cooked.
Frequently Asked Questions
Why Do You Cut Tri-tip Against The Grain?
Cutting tri-tip against the grain shortens the muscle fibers, enhancing tenderness and improving the eating experience. This technique ensures your meat is less chewy and more enjoyable.
How Do You Know To Cut Against The Grain?
To cut against the grain, first identify the meat’s muscle fibers direction. Then, use a sharp knife to slice perpendicular to those fibers. This technique ensures tender meat. Observing the meat’s texture and direction before cutting will guide you effectively.
What Kind Of Knife Is Best For Cutting Tri-tip?
A sharp, long-bladed slicing or carving knife is best for cutting tri-tip, ensuring clean and precise cuts.
What Part Of The Cut Is Tri-tip?
The tri-tip is a lean, tender cut from the bottom sirloin of a cow. It is recognized for its triangular shape and rich flavor.
Conclusion
Cutting tri tip correctly enhances its flavor and tenderness. Remember the grain direction. Slice against it for the best results. Keep your knife sharp for smooth cuts. Practice makes perfect, so don’t worry if it’s not flawless at first. Enjoy your perfectly sliced tri tip with friends and family.
Share these tips to help others master the art of slicing this delicious cut. Your next barbecue will be a hit with these slicing skills!