Every product is independently reviewed and selected by our editors. If you buy something through our links, we may earn an affiliate commission at no extra cost to you.
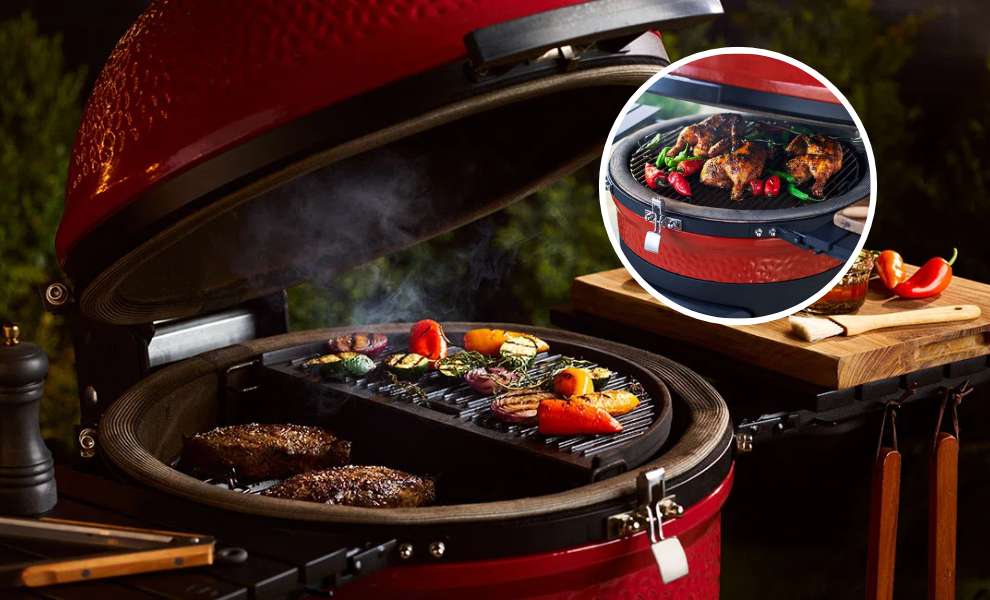
Due to their versatility and ease of use, Kamado grills have been a backyard grilling staple ever since they were invented. Even if you own one, you might be surprised to know a good Kamado can do a lot more than you have been utilizing it for.
Welcome to Kamado Cooking 101. Akorn vs Kamado Joe does not matter as long as you own any Kamado grill. Here we will let new owners, as well as intermediate users, know about all the best accessories, recipes, and tips so that you can unlock the full potential of your Kamado Grill.
Let’s begin:
20 Kamado Grill Must-Have Accessories At A Glance
Accessories are a key part of any Kamado grill and that is exactly where we begin our journey today. Your grilling experience can only be as good as the equipment you use and these 20 will open a whole new world of possibilities for you.
BBQ Grill Oven Gloves: Does an oven mitt get your job done? The answer can only be yes if you have never used a proper BBQ glove. This one from Rapicca is our top pick as it offers awesome temperature resistance in 3 different sizes at a pretty reasonable price.
Kamado Joe Charcoal Basket: Kamado grills can be a bit difficult to clean up. Especially with the loose charcoal ash contaminating your leftover fuel. A charcoal basket is a lifesaver in this case.
This one from Kamado Joe also offers a divider so that you can create two different cooking zones at two different temperatures. However, Kamado Joe Charcoal Basket vs Kick Ash Basket has been a pretty relevant debate so pick whichever you want.
Kamado Joe JoeTisserie: Did you know that you can get a tender, juicy, and warm rotisserie chicken from Kamado Grills? You can with this accessory.
The chicken cooked using the JoeTisserie inside a kamado will also have a distinct smokey flavor you can’t get anywhere else.
Kamado Joe SloRoller: Kamado grills can be used as smokers but they aren’t really that good are they? Thankfully the Kamado Joe SloRoller is an engineering marvel that will circulate a lot more smoke inside your Kamado leaving virtually zero hotspots.
Kamado Joe Pizza Stone: A dedicated pizza oven can be too bulky or expensive and totally unnecessary when you already own a Kamado Grill. You just need a quality Pizza stone (yes baking trays can get the job done but who wants a soggy crust?) and this one from Kamado Joe fits the bill.
Kamado Joe DoJoe: The pizza stone not cutting it for you? Want crispier crust with better charring? The Kamado Joe DoJoe is the next step up. It can do everything a stone can while making sure you do not need to take the lid off. Trapping all the heat inside to give you the most perfect Kamado Grill pizza.
Kamado Joe Grill Expander: Investing in a smaller grill just because it is a bit cheaper is a rookie mistake and while we would like to say we never made the same mistake, it won’t be true. Thankfully, the Grill expander will increase the cooking surface of a supported kamado by up to 60%.
Kamado Joe Soapstone: For those who do not really like the uneven searing and scorching points offered by any Kamado but still really like the smokey flavor, the Kamado Joe Soapstone is the perfect accessory.
It will give you a good even surface to sear your meat or fish while ensuring the smokey flavor remains intact, unlike stovetops.
Half Moon Cast Iron Griddle: If the soapstone was too difficult to maneuver, the Half Moon Griddle offers improvements in handleability and trades in the searing temperature.
The divide and conquer system in Kamado Joe grills can also utilize this accessory to increase the cooking surface by a whopping 50%.
Butcher Paper: For hardcore meat smoking, aluminum foil just doesn’t cut it. The top-quality butcher paper is what you should use if you want your meat to come out perfectly smokey every time.
Kamado Joe Lump Charcoal: A good fuel is just as important as your grill and it will also ensure that your meat is free of any impure flavors that sting the palette.
Invest in a good quality back of lump charcoal like this one here to have the best BBQ experience. The Cowboy lump Charcoal is another one of our favorites.
Turkey Brining Container: Holiday season is the highlight for turkey eating and a lot of people struggle with a proper brining method for these giant birds.
Regardless if you like to cook them in an oven or a kamado, one of these turkey bringing containers will make your life super easy.
Kamado Joe Fire Starters: What good is a great back of lump coal if you struggle with lighting them properly? That is why you should always have a good brand of fire starters in your pantry, like this one from Kamado Joe.
Black Pepper: Yes, you probably already have your supermarket-branded black pepper in your pantry. We are just here to tell you that you can get the most out of your smoked brisket using these best black peppers.
Peppers are essential in any BBQ and you should dish out for a high-end brand as they will provide you with a flavor your supermarket can only dream of.
Heat Deflector Plates: A heat deflector plate’s job is to partially block off the flame from certain parts of your grill so that you can cook multiple things at different temperatures at the same time. Sounds intriguing? Get one today.
BBQ Sauce: Making your own BBQ sauce from scratch is rewarding but takes a bit too much effort for people with minimal time and resources at their disposal. That is why we implore you to research the market a bit to see what lies beyond your Heinz and Sweet Baby Ray’s.
Grill Grate Lifter Gripper: Sometimes we all need to do a quick cleanup after a BBQ session and it can be a disaster as dealing with a hot grill is a nightmare without the proper equipment.
That is why we think everyone should own a grill grate lifter and this one from Vankey is our favorite.
Chicken Rack: The empty beer can method works fine in a pinch but you can only take it to the next level with a proper chicken rack. With one of these tools, your chicken will cook properly from the inside out while you don’t need a bottomless supply of aluminum cans.
Ranch Dressing: Buffalo wings, pizza, or burnt ends a dip in good old ranch makes everything taste better. Just like with BBQ sauce, we recommend you go a bit out of your comfort zone to find the best ranch dressing for you.
Stainless Steel Rib Rack: Finally, no grill set is complete without a good stainless steel rib rack. Regardless of how often you cook ribs, this one is a no-brainer and will get your ribs tasting straight out of Texas.
Kamado Cooking 101 for Beginners To Pro
Now that we are done with the accouterment you need for the best Kamado grilling experience, let’s get onto what you can actually cook with your precious Kamado.
To be fair, there is not much you can’t do in a Kamado as the possibilities are truly endless. Below we will showcase some of the dishes best suited to be cooked in a Kamado Grill.
How to Start a Kamado Grill – Starting Your Kamado
All the best recipes in the world won’t be enough if you do not nail the starting of your Kamado to a tee. It is not a difficult process by any means but either way here is a step-by-step on how to do it:
Step-1: Measuring the Fuel
Set the bottom vents to their widest openings and the lid to its highest position. Fill the fire bowl halfway with charcoal, just enough to block the air vents.
Adding a little additional charcoal, up to around 2 inches/5 cm above the same air holes, can allow you to smoke items at low temperatures for longer than a couple of hours. For the greatest results, lump charcoal should be used.
Step-2: Lighting the Charcoal
Lighting can be done by any method you prefer. We recommend fire starters as they are easy and affordable. Just put 2-3 starters in the coal and light them with a matchstick or lighter.
Step-3: Waiting
Continue to wait 10-15 minutes, and once a major portion of the charcoal has been smeared with something like a dark gray ash-like coating, you may add a little amount of more charcoal and seal the grill lid.
Make sure that both the bottom and top air vents are open since this will allow the charcoal to burn more quickly. Once you’ve reached the correct temperature, you can close the desired vents to start cooking.
Best Things To Cook On Kamado Joe
Imagine all the things you can cook in your regular kitchen oven. Now those are the same things that can be done better on a Kamado Joe or any other Kamado Grill.
In addition to that, your Kamado can reach searing temperatures and thus can cook things your oven can’t even dream of like ribs and briskets.
Also in addition to that things like steaks, chicken, and burgers that are cooked best on stovetops, are also better inside a Kamado.
However, in no particular order, these are the things that truly showcase the abilities of a kamado grill-
- Beef ribs
- Smoked Brisket
- Pizza and Foccacia
- Steaks and Burgers
- Deserts like Cobblers
- Chicken preparations like Jerk, Grill
- Corn, Sweet potato, and other veggies
- Seafood preparations like Salmon and Shrimp
Kamado Smoked Meat Recipes
Smoking or searing meat is literally the bread and butter of any Kamado Grill and it is one of the first things you should try after getting your brand new Kamado.
Different cuts of meat, especially beef require different temperatures and preparations and the Kamado can ace them all.
Here are a few preparations of meat that are easy enough for anyone to try while tasting absolutely out of this earth:
Texas Style Beef-Brisket: Brisket is basically the breast meat of a cow and due to the high movement of this muscle throughout a cow’s lifespan, it is one of the toughest beef cuts.
But also for this exact reason, it is perfect for being smoked over a long period of time with a fantastic dry rub. If you can buy an entire brisket you can use that or just go for the point.
The first thing you need to nail in this recipe is the dry rub. Mix paprika, salt, garlic powder, onion powder, black pepper, dried parsley, cayenne, ground cumin, ground coriander, chili powder, dried oregano, and brown sugar in a bowl.
Trim the fats and silver skins off the brisket and pat it dry. Cover it in the rub and press it down with your hands and throw it in your smoker for 8 to 12 hours at 250° F and you’ll have one of the best briskets of your life.
This brisket can also be made into amazing sandwiches and you just need to know the best bread for the brisket sandwich (spoiler alert! It’s brioche).
Beef Cheek Tacos: Like the brisket, the cheek of the beef is an incredibly tough piece of meat that really benefits from the low and slow method. The dry rub is a lot similar to the brisket and you can adjust it to your liking.
Put the rubbed cheeks on your kamado and set the temperature at 250° F for around 2.5 hours. After that time is over, you need to take a baking tray and fill it up with a liquid, like ginger beer, apple juice, or regular beer, and cover the beef halfway up and cover with a foil and go for another 2 hours.
You’ll be left with amazing-tasting beef chunks that you can dice up and serve inside corn tortillas with your choice of condiment for a mouthwatering taco.
Reverse Sear Steak: Normally, reverse searing steak requires a cast iron pan on a stovetop and an oven. But a Kamado grill can do both of their jobs.
First, you need to cook your steak inside the Kamado but not on top of the coals, Basically cooking them on indirect heat for 5-7 mins and then charring or searing them on the hot spots of the grill. Trust me, it will be even more delicious than cast iron and ovens.
Kamado Poultry Recipes
Much like meat, poultry can be cooked to perfection in a Kamado. From whole chicken to wings to turkeys, a little bit of know-how will get you fabulous results that will leave your guests wondering what restaurant you worked at.
Here are a couple of things you can try:
Roast Whole Chicken: This recipe will also work for smaller turkeys and the only variation will be in cooking time. The predominant flavor here will be garlic and herbs.
First, you need to pat dry your chicken and place it in a marinating bag with a herb mix, pepper, salt, olive oil, and garlic.
Then bring the temperature of your Kamado to around 275° F and place the chicken inside with a temperature probe. Cook the bird for around a couple of hours flipping halfway through or until the internal temp reaches 165° F and voila.
Grilled Jalapenos Wings: Did you know your Kamado can make great chicken wings? You do now. All you need is an all-purpose steak seasoning and pickled jalapeno.
Combine these two and blintz them in a food processor before marinating the chicken wings for 3 hours overnight. Get your grill to a toasty 300° F and put the wing’s skin side down on top of the grates.
Cook on both sides until the internal temperature reaches 165° F and serve with any dipping sauce.
Kamado Grill Seafood Recipes
Seafood is one of those things that a typical home cook will stay away from as the high cost of products added to the high risk of failure make it one of the most difficult home preparations to pull off.
But with a Kamado grill, it can be very very easy. Like this preparation of Salmon:
Citrus Smoked Salmon: No brunch is complete without smoked salmon on a piece of bagel and we want to show you how to make it at home.
You need a 2lbs deboned piece of skinless Salmon mix a generous amount of salt, brown sugar, and citrus zest in a big mixing tray and cover the entire piece of salmon and place it on your fridge for 48 hours.
After that time bring it our, give it a nice ice bath and pat dry. Put the Kamado at 200° F and place a parchment paper on the grates on top of which the salmon will rest and cook for 105 to 120 minutes or until the internal temperature reaches 145° F.
Slice thinly and serve on top of your choice of bread for the breakfast food that is promised in heaven.
Kamado Grill Vegetable Recipes
Vegan? Or just health-conscious? No worries, the Kamado can whip up some magic for you too. Like this Herb smoked sweet potato recipe:
Herb Smoked Sweet Potato: For this recipe, you need to find the biggest sweet potatoes you can find and boil them in salted water until they are tender but not fully cooked.
Then bring them out and slice in half with any of the knives to cut sweet potatoes and brush them down with olive oil and after which you will sprinkle a generous amount of Italian seasoning, salt, and pepper.
Place them inside your Kamado on top of a pizza stone at 250° F for around 20 minutes and out comes a beautiful smoked sweet potato.
Additional Recipes
Remember how we said that the Kamado can do everything your traditional oven can? Here’s the proof with these next 3 recipes:
Margarita Pizza: The simplest form of pizza can also often be the most delicious. We are talking about the classic margarita and for this, we recommend you either have the Pizza stone or the DoJoe.
Either way, get some store-bought pizza dough and margarita sauce or you can even make them on your own, roll the dough out, spread a thin layer of sauce, and top with low moisture mozzarella and basil leaves and sprinkles of extra virgin olive oil.
Set the Kamado with the stone inside to 500° F and place the pizza and cover. It will only take 4 to 5 mins to cook to perfection.
Smokey Grilled Cheese: Even the name on this recipe might sound preposterous to some but don’t try it before you knock it. Get two slices of thick sourdough and drench them in butter before layering cheeses like sharp cheddar, gouda, or American slices.
You can also add some ham slices if you want. Put your kamado at 500° F and put a cast iron or just plain parchment paper on top of the grates and cook just like you would on the stovetop. The results will definitely surprise you.
Bourbon Blackberry Cobbler: After all the savory dishes, here’s a rich acidic dessert to round things up. Before heating your grill up to 375° F, put your blackberries in a freezer.
After they are fully frozen, combine them, citrus zest, citrus juice, bourbon, brown sugar, and allspice in a bowl and mix. Butter a 12” cast iron pan and put the mix on it and top it with bread crumbs or streusel mixture.
Finally, bake for 45 minutes or until the top look crispy and golden brown. This dessert is sure to calm your palettes down after a heavy BBQ afternoon.
How To Cook On A Kamado Joe
The first thing you need to master with the Kamado Joe is starting it with the proper amount of charcoal. Depending on the type of cooking you’re about to commence, the temperature needs to be different and thus a varying level of charcoal should be used.
For example, searing a juicy piece of steak will require you to fill your Kamado up with charcoal so that your temperatures are as high as possible.
On the other hand, smoking a piece of brisket requires low temperature with no hotspots and for this technique, you will need to fill the grill with coals around halfway.
Details on different cooking techniques for Kamado Joe grills can be seen below:
Kamado Joe Cooking Techniques
To master the Kamado, you need to master all of its cooking techniques. Most of them can be executed decently by a newbie but with experience comes the ability to bend the tool to your will and produce perfection.
Here’s how you can go on about the different cooking techniques of a Kamado Joe:
Beef Tenderloin
Tenderloins are some of the most expensive but easy to cook cuts of beef. But on the Kamado this will require the mastery of searing hot coals and your life will be easier with a half-moon iron griddle accessory.
Always remember to trim off excess fat and silver skin. Marinate the meat in your choice of a wet rub and wear a heat-proof glove to brush the cast iron with oil.
Place the meat on the grates but knowing when to flip will require a bit of experience. If you feel like the meat is sticking, this is not the right time to flip.
You are looking for deep sear marks and amazing brown color. Practice and you’ll get there sooner or later.
Baking & Roasting
The heat deflector plates will come into play here. Block the direct flame with them so that you can create a makeshift oven for pizza or veggies of your choice and cook on top of grates or a pizza stone.
Controlling the top and bottom vents are also key here. Start with halfway open in both and adjust to keep the temp stable.
Also, every time you open up the lid, do remember to burp the grill (keeping the lid open just a bit for 5 seconds) otherwise it can be quite dangerous.
Smoking Techniques
Knowing what wood smoke goes with what dish is the cornerstone of every smoking expert’s skillset. For example, hickory works best for pork while maple works well for briskets.
But this is where experience comes in as you need to play around to find your preference. Heat deflectors are also essential here to maintain even temp just like vent control.
The initial thick white smoke should also be avoided if you do not want weird flavors in your meat.
Searing Techniques
Searing is perhaps the most difficult to master of them all as this is always done with incredibly high heat. No fancy heat deflector is needed. Give your grill as much air circulation as possible so that the temperature gets as high as possible and cook straight on top of the grates.
Grilling Techniques
Just so you do not get very intimidated, we are closing it up with grilling. It is the easiest technique and anyone can master it with even 2 cooks. Cooking grates are just fine and you’ll need around 400° to 600° F.
Vents open halfway will easily get you there. As easy as this technique might be, you can still produce wonders with it.
How To Cook Low And Slow On A Kamado
The secret to cooking low and slow is to use the right kind of wood mixed in with your lump charcoals (not briquettes) and know what temperature you want to cook at.
I recommend the range from 200 to 270 degrees Fahrenheit. I also highly recommend that you invest in a probe thermometer like the one built into your Kamado can not really be trusted to give accurate readings.
Here is the full step-by-step on what to do:
- Light your lump charcoal inside the grill, wait for around 10-15 mins and sprinkle your choice of hardwood chips around the lit coal.
- Use a heat deflector plate if you have it and the grates. Put the probe in and close the lid.
- Wait for your grill to reach the desired temperature. Close the vent if the rise is not as high and open it to get it lower.
- Place the meat inside with a temperature probe sticking in and close the lid.
- Constantly monitor the temperature. Play with the top and bottom vents to keep temperature fluctuation at a minimum.
Since low and slow takes a long time to get a hard cut of meat to a tender and juicy bite, wait around for however long you need.
Do not open the lid unless you absolutely need to and always monitor the temperature as that is the one key to getting a good low and slow cook.
Can You Use Wood Chips In A Kamado Grill
Yes, you can use both wood chips and wood chunks inside a Kamado grill. You just need to soak the chips in water beforehand as they are already very small and without the water slowing down the burning, they will burn out before you even understand anything.
How To Control Heat On The Kamado Grill
The draft door of a kamado is located at the lowest half of the grill. It’s the most important aspect to control the temperature of your grill.
Increased airflow is achieved by opening the draft door. Because fire requires fresh air, the temperature goes up if the door is left open.
When the vent is not opened, the fire burns at a more moderate temperature. This door is the secret to how a Kamado can reach temperatures ranging from sub-200 degrees to beyond 700 degrees.
In most kamado grills, you may adjust the temperature by using the top vent throughout the cooking as well. It allows heat and smoke to escape from the lid when it is closed.
How To Stack Charcoal In Kamado?
Before you do anything, you need to start with a squeaky clean firebox. It might seem a bit trivial but trust us it is not. So give the firebox of your grill a thorough cleaning first.
After that what you need to do is go through your bag of lump charcoal and divide them into 4 parts. Large, medium, small, and dust.
Place the largest block of coal dead center in your perfectly clean firebox. Due to the fact that it will be the last component to burn, and since it will not block the bottom holes, the air circulation will stay reasonably uniform during the whole cooking period.
In a jigsaw puzzle fashion, arrange the remaining large pieces until the overall appearance is as even as you can get by using only the large parts.
After that, fill in as many gaps and cracks as you can with medium-sized pieces until the surface seems relatively even. Then, using the tiniest pieces, fill in the rest of the space.
Last but not least, take all of that coal dust and level out your bed of charcoal. Fill the firebox to the brim, but do not go any higher.
For reference, the method we described here is known as the Elder Ward method around the internet.
Kamado Joe Temperature Guide
We have already touched on how you can control the temperature of the Kamado Grill using the two vents along with the various accessories available. Now all you need to know is what temperature is right for what type of cooking.
Below you will find a helpful chart listing the proper temperatures for different types of cooking you can tune in more to your specific taste and grill model but we think it is still a great baseline to start from.
Most Kamado Grills should be able to comfortably fit all the temperature ranges from this chart while a more premium grill can reach temperatures upwards of almost a 1000° F.
That high temperature is not really needed and can even go out of control very easily so if you do see your grill getting that hot, put a leash on it and do it quickly.
For a beginner, it will be a bit difficult to effortlessly control the temperature so all we can recommend you is to practice, and over time you are sure to get the hang of it.
Kamado Joe Cooking Channel Overview
If you like this article and everything we explained here, you will be thrilled to know that this YouTube channel here goes into a lot more depth about each individual topic while talking about a lot less orthodox things.
If you already own a Kamado Joe or planning to get one in the near future, consider this channel an indispensable part of your kamado mastering journey.
Conclusion
Kamado cooking is truly a bottomless pit that just keeps on giving. The more you experiment with it the more you will find new and unique ways to utilize this amazing cooking tool.
And it seems like this segment will be shaken up yet again with the release of the Blaze Kamado Grill. With our Kamado Cooking 101, we hope you are equipped with all that you need to get your journey started.
Just remember, we only scratched the surface here, there is so much more to know and discover that you can spend the next decade of your life being happily in love with a Kamado.